Before we begin, the completed solution is available on GitHub.
BigCommerce offers the ability to create reusable components in the page builder called “widgets”. It comes with a few out of the box but also comes with the ability to create your own. They can be created either by pushing them directly via their API or using their widget builder. For the purposes of this demo, I did everything in widget builder.
One of the features BigCommerce offers is the ability to define custom “schema” for widgets, which is a fancy way to say options that can be edited for each instance of the widget. They can be simple, like the title and background image to use for a banner, but can also get more complex and include things like arrays of properties. One notable type is the “product ID” type, which presents itself to your widget as the ID of a product but in the admin panel is a tool that lets you search products in your store, making it very easy to insert a product teaser or something like that.
Additionally, to fetch data from the store, you can include GraphQL in your widget. The GraphQL query will use data supplied from the admin panel (with the structure defined by the schema) and provide the necessary data for the template. For example specific example, you can include a product ID selector in the admin panel then use GraphQL to get the name, image, link, etc. for the product. BigCommerce provides an example of how to do that.
However, one thing they do not seem to document is how to make the same thing work for multiple products. Sure, you could just define a bunch of separate individual products, but that’s going to get really obnoxious to work with and maintain. One alternative is use an array of products, which is better, but it turns out there’s an even better way to do it: product set.
First, we need to define our schema. In widget builder, create the following schema.json file:
[
	{
		"type": "tab",
		"label": "Content",
		"sections": [
			{
				"label": "Products",
				"settings": [
					{
						"type": "productSet",
						"label": "Product Set",
						"id": "product",
						"entryLabel": "Product",
						"default": {
							"type": "manual",
							"value": []
						}
					}
				],
				"typeMeta": {
					"type": "setSection"
				}
			}
		]
	}
]
This defines an attribute of type “productSet” (i.e. a list of products”) with the ID “product”.
Next, we need to pass the values from that selection into GraphQL. We can further edit the schema and add another element of type “graphQl” that specifies the mapping from schema parameters to GraphQL parameters. We do that in the text highlighted below.
[
	{
		"type": "hidden",
		"settings": [
			{
				"type": "graphQl",
				"id": "graphQueries",
				"typeMeta": {
					"mappings": {
						"productIds": {
							"reads": "product.value.*.productId",
							"type": "Int!"
						}
					}
				}
			}
		]
	},
	{
		"type": "tab",
		"label": "Content",
		"sections": [
			{
				"label": "Products",
				"settings": [
					{
						"type": "productSet",
						"label": "Product Set",
						"id": "product",
						"entryLabel": "Product",
						"default": {
							"type": "manual",
							"value": []
						}
					}
				],
				"typeMeta": {
					"type": "setSection"
				}
			}
		]
	}
]
Next, we need to write the GraphQL query. To do that, create the file query.graphql:
query productsById($productIds: [Int!]) {
  site {
    products(entityIds: $productIds) {
      edges {
        node {
          entityId
          sku
          name
          path
        }
      }
    }
  }
}
This query looks up the ID, SKU, URL path, and name of each product for any product in the $productIds parameter (which we passed in via GraphQL mapping). Important to note here is the type: $productIds is an array of non-nullable ints ([Int!]), while in the mapping, we specified the type for each individual element to be a non-nullable int (Int!), which was automatically aggregated to be an array by the widget utility.
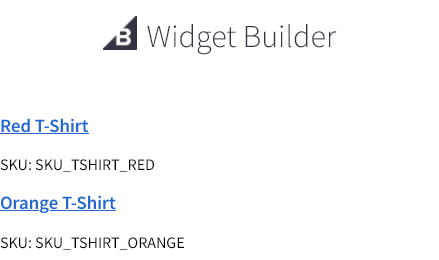
Finally, we can actually use this data in the template. In this very limited example, you can see a list of the product names by creating widget.html with the following content:
{{#each _.data.site.products.edges}}
<h3><a href="{{node.path}}">{{node.name}}</a></h3>
<div>SKU: {{node.sku}}</div>
{{/each}}
With that, we have rendered a list of products! See the final result below.